
Terry’s Tidbits: Integrating Salesforce and Microsoft Office 365 SharePoint

Terry’s Tips: Salesforce 2019 Winter Release Highlights You Will Love
November 14, 2018
Single Sign On with Microsoft Azure AD
April 12, 2019
| Available for Lightning and Classic, Professional Edition and up |
Wouldn’t it be nice to have a way to link files from SharePoint with Salesforce? You can! This step by step guide will walk you through the process. Be warned, it is a long process and it’s easy to make mistakes. I’ve tried to carefully identify the areas that are simple to get wrong so you can avoid them; maybe better stated, learn from my mistakes!
There are a couple good reasons for setting this up.
- First, your SharePoint files don’t count against your Salesforce File Storage Limits
- Second, you’re able to use SharePoint security to maintain greater control over who can access a file.
- Third, you can extend visibility to SharePoint files from within Salesforce mobile.
So let’s get started on this journey. You will need to include both a Salesforce Admin and a Microsoft Azure Admin.
Step 1: Enable Files Connect
- Go to Setup
- Search for Files Connect in the Quick Find and select it.
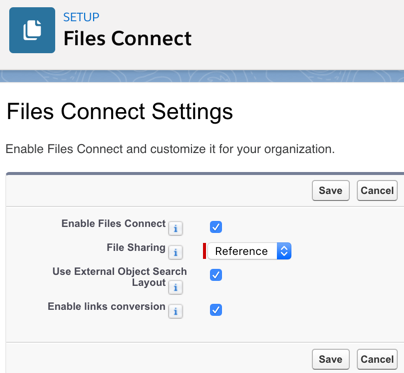
- Edit the Settings and Enable Files Connect
- Select the File Sharing method that is preferred. Reference basically links to the OneDrive file. Whereas, Copy duplicates the file within Chatter Files. If you are relaying on Microsoft’s security to manage access to files, you’ll want to select Reference.
- If you want to be able to use Salesforce Search to find the files, check the Use External Object Search Layout box.
- Press Save once you’ve made the selections
Step 2: Setup Permissions
- Go to Setup
- Search for Permission Sets in the Quick Find and select it
- Press New to create a new Permission Set
- Give it a Name such as Access to Microsoft OneDrive
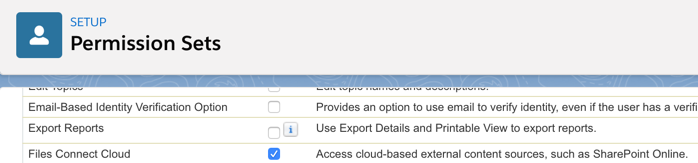
- Go into the System Permissions section and press the Edit button
- Scroll down and select Files Connect Cloud, then press Save
- Click on the Manage Assignments button
- Add the Users who will need visibility to the OneDrive folder
Step 3: Setup an Authentication Provider
- Go to Setup
- Search for Auth. Providers in the Quick Find and select it
- Press the New button in the middle of the screen
- Select Microsoft Access Control Service as the Provider Type
- Enter the Name you want to appear in Salesforce Files screens. I would suggest SharePoint or OneDrive
- Now it starts to get a little goofy. We need to create simple placeholder values for the next several fields.
- Consumer Key: x
- Consumer Secret: x
- Authorize Endpoint URL: https://www.google.com/
- Token Endpoint URL: https://www.google.com/
- Check the Use subdomain in callback URLs
- Leave the remaining field blank
- Press the Save button and you should see something like the screen below:

Step 4: Register an a Web Application App using Azure
- Log in to Azure at https://manage.windowsazure.com
- In the left navigation menu, select Azure Active Directory
- Select App Registration, from the Azure Active Directory menu
- In the header menu, click New application registration.
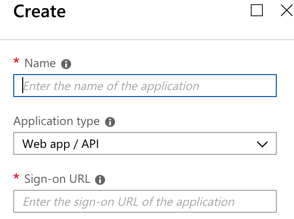
- Enter the Name of your app. Something like Salesforce App
- Choose Web app / API for the Application Type
- For the Sign-on URL, you can enter any valid URL like https://www.login.salesforce.com
- Press the Create button at the bottom of the screen
- Copy the Application Id to notepad as this will need this in Step 5 for the Consumer Id
- Press the Certificates & Secrets link from the left navigation menu
- Press the New Client Secret button

- In the Key description field, enter any description that helps you identify the key. I simply name it Salesforce
- Select a duration of 1 or 2 years depending on how long you want this key to be effective. I typically choose 2 years.
- Press the Save button
- IMPORTANT: Copy the Key Value. You will not be able to retrieve this later. This will be be used in Step 5 for the Consumer Secret.
- Select Authentication from the left navigation menu
- Press the Add URI link under Redirect URIs
- Copy the Callback URL from the Auth Provider created in Step 3 and paste it into the Reply URL field.
- Press the Save button
- From the left navigation menu, select API Permissions from the Settings screen
- Click the Add a Permission button
- Press the Select an API link
- Select the SharePoint option
- Select the level of right you want the Salesforce app to have as it relates to SharePoint. Work with your security experts to determine the best options for your needs.
- For Application Permissions, I would choose a minimum of:
- Read user profiles
- Read managed metadata
- For Delegated Permissions, I would choose a minimum of:
- Read user profiles
- Read user files
- Run search queries as a user
- Read managed metadata
- Press the Add Permissions button
- For Application Permissions, I would choose a minimum of:
- Press the Grant Permissions button
- Press the Yes button
- Press the Grant Permissions button
- Enter the App Permission
This is a step that is missed in the Azure version of the documentation but if skipped, you’ll receive a permissions error when you get to step 6. I spent hours trying to figure this out. If you know how to do this step via the Azure portal, please let me know and I’ll update this posting.
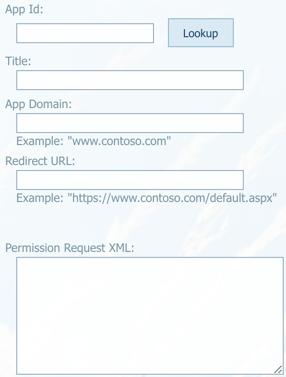
- Goto https://yourCompanyName.sharepoint.com/_layouts/15/appinv.aspx
- Copy the Application Id captured earlier in this step and paste it into the App Id field.
- Press the Lookup button
- App Domain = www.salesforce.com
- Once the application information appears, paste the following into the Permission Request XML:
- <AppPermissionRequests>
<AppPermissionRequest Scope=”https://sharepoint/content/sitecollection/web” Right=”Read”/>
</AppPermissionRequests>
- <AppPermissionRequests>
- Press the Create button. This will NOT create a new Application but will update it with the correct permissions.
Step 5: Update the Authentication Provider Settings
- Back in Salesforce, Go to Setup
- Search for Auth. Provider in the Quick Find and select it
- Click Edit for the Authentication Provider created in Step 3
- In the Consumer Key field, paste in the Application Id copied from Azure in step 4
- In the Consumer Secret field, paste in the Application Key Value from Azure in step 4
- In the Authorize EndPoint URL field, paste in one of the following. Be sure to replace the yourCompanyName and siteCollectionName with your values. For the SharePoint, you can setup Sites, and that’s what you’ll use for the siteCollectionName. I setup a site called Salesforce, then any files I want to make available within Salesforce are stored within that site.
- OneDrive for Business
- https://yourCompanyName-my.sharepoint.com/_layouts/15/OauthAuthorize.aspx
- SharePoint Online – This is the one I used for Office 365
- https://yourCompanyName.sharepoint.com/sites/siteCollectionName/_layouts/15/OauthAuthorize.aspx
- OneDrive for Business
- In the Token Endpoint URL field, paste in one of the following. Be sure to replace the yourCompanyName with your SharePoint domain.
- OneDrive for Business
- https://accounts.accesscontrol.windows.net/yourCompanyName.onmicrosoft.com/tokens/OAuth/2?resource=00000003-0000-0ff1-ce00-000000000000/yourCompanyName-my.sharepoint.com@yourCompanyName.onmicrosoft.com
- SharePoint Online – This is the one I used for Office 365
- https://accounts.accesscontrol.windows.net/yourCompanyName.onmicrosoft.com/tokens/OAuth/2?resource=00000003-0000-0ff1-ce00-000000000000/yourCompanyName. sharepoint.com@yourCompanyName.onmicrosoft.com
- OneDrive for Business
- Press Save
Step 6: Setup External Data Source record
- Go to Setup
- Search for External Data Source in the Quick Find and select it
- Press the New External Data Source button in the middle of the screen
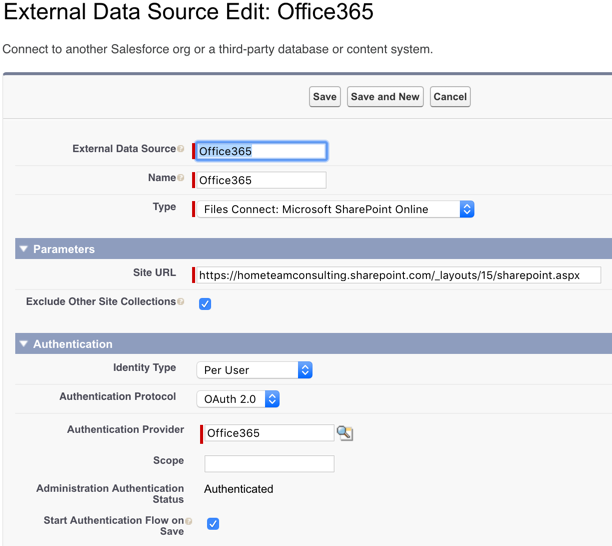
- Enter a Name such as Office 365 or SharePoint. This is how it will be referenced for your users.
- For the Type, select Files Connect: Microsoft SharePoint Online
- Alternatively, Microsoft OneDrive for Business if that’s what you’re using
- Login to OneDrive or SharePoint. You’re looking for the URL that will follow this format: https://yourDomain.sharepoint.com/_layouts/15/sharepoint.aspx. Enter that value in the Site URL field. It’s important that you get this correct so be sure the URL ends with the /sharepoint.aspx.
- The Exclude Other Site Collections is optional but if you have multiple Site Collections on SharePoint, then you may want to limit the visibility to one specific Collection.
- If you are managing file-level access, then you’ll want to use the Per User Identity Type. Users will need to log in before being able to access the files unless you’re using single sign-on. If all users will connect with a common login, then choose the Named Principle.
- Oauth 2.0 is the Authentication Protocol
- Select the Authentication Provider you built-in STEP 3.
- Leave Scope empty
- Select the Start Authentication Flow on Save to validate connective upon saving this record
- Press the Save button
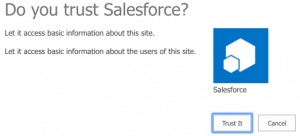
- If everything was setup correctly, the following screen should appear.
- Press the Trust It button
- If you have all the URL’s correct, you should be okay but I’ve also had several attempts where I’ll receive a OAuth has Expired error. If you have this issue, try this tips in this link: https://help.salesforce.com/articleView?id=000229563&type=1
Step 7: Creating the External Data Source Object
I know this is a long process with lots of steps but we’re almost done. Hang in there.
- If you’re not still on the External Data Sources screen, go there now.
- Instead of editing your external data source, click on its name to open the record.
- Press the Validate and Sync button. Cross your fingers and then the screen below will appear. If not, you most likely have some errors with the URL’s you’ve used in Step 5.
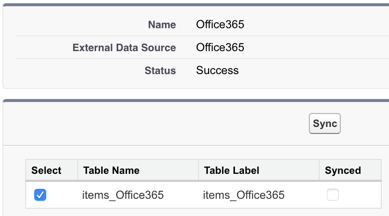
- Click the checkbox
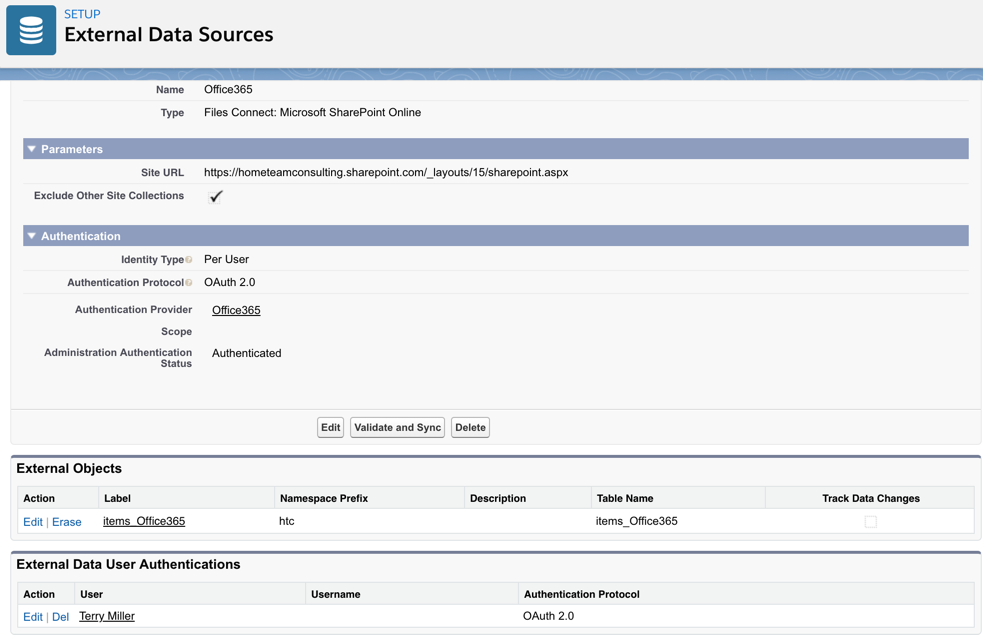
- Press Sync button. Once complete, you should see a screen similar to this:
- This created a new object in Salesforce with a “__x” suffix. You can click on the External Object’s label and see it has similar characteristics of other objects.
Step 8: Add Files Connect to Global Search
- Go to Setup
- Search for Files Connect in the Quick Find and select it
- Verify that you’d selected the Use External Object Search Layout checkbox. If not, edit the record and select it.
- Search for Permission Sets in the Quick Find and select it
- Click on the name of the Permission Set created in Step 2
- Click on Object Settings
- Scroll down to find the name of your External Object and click it
- Press the Edit button
- Check the Read object permission and any other field level permission you need.
- Press Save
- Scroll down to find the name of your External Object and click it
- Click on External Data Source Access
- Press Edit button
- Move your new Data Source to the Enabled External Data Source side
- Press Save
- Press Edit button
View more of our tips for getting the most out of Salesforce by following us in our social media channels below.